Laser Sensors and Automated Assembly
Very accurate and super fast, these noncontact sensors are ideal for various measurement, inspection and defect-detection applications


Manufacturers love established assembly line technologies not only because they produce expected results. But, also because they occasionally provide an unexpected benefit.
Noncontact laser sensors, for example, are great for high-volume applications and detecting the presence of small parts in an assembly at long distances. In addition, however, their bright laser makes ambient dust on the assembly line visible to operators, who, in turn, take steps to increase the line’s cleanliness and ensure optimum sensor performance.
For end-users like systems integrator Bluewrist Inc., optimum sensor performance means fast, accurate, consistent and reliable. These capabilities are the reason why Bluewrist uses several laser sensors in its 3D machine vision system, which helps robots precisely insert front and rear windshields in vehicles.
Developed a couple years ago, the system consists of Bluewrist’s EzRG robot guidance software and four Gocator 2300 series 3D smart sensors mounted on the robot’s end effector. Made by LMI Technologies Inc., the sensors are immune to robot movement and vibration.
On the assembly line, a large six-axis robot picks up the windshield from a fixed location using suction cups and moves the glass to a predetermined insertion point. There, the sensors project red 635-nanometer laser lines across the four edges of the windshield and auto-body aperture.
After reflected laser light is digitized by a camera embedded in each sensor, built-in measurement tools determine the X, Y and Z coordinates of the windshield and send this data to an external Advantech PC equipped with EzRG software. Within 0.5 second, the software calculates transformation data in six degrees of freedom and sends the results to the robot controller.
The robot uses the calculated transformations to guide the windshield into position on the aperture and insert the glass. Guidance accuracy is ±0.2 millimeter.
Aerospace, medical-device and semiconductor manufacturers, as well as those that perform packaging, also rely heavily on laser sensors. Whether it’s for measurement, inspection or defect detection, these companies use the latest single-point, 2D and 3D laser sensors to successfully complete the application at hand.
The Beneficial Beam
Like any technology, lasers offer many benefits and a few limitations. On the plus side, the laser from a laser sensor is a finely focused beam that’s great for tiny part detection, according to Jack Moermond, engineering partner manager at Balluff Inc. It also has a consistent color, width and wavelength, which are equally beneficial.
“Sensors are the eyes of the factory and becoming more popular as their cost lessens,” notes Dana Holmes, business development manager for sensors at Banner Engineering Corp. “Laser sensors, in particular, provide many benefits. Their beam is visible so operators can better aim it to exactly where it should go. Many sensors offer increment precision as low as 1 micron and automatic adjustable beam intensity to optimize contrast on the target. Plus, they’re great for verifying that a moving part has reached the correct location and is properly orientated.”
Until recently, the typical laser beam was red. Many suppliers now offer laser sensors with a blue laser because it’s better at minimizing surface reflections and more accurately scans specular surfaces, according to Terry Arden, CEO at LMI
Technologies.
Brad Powell, president and technical director at Origin Technologies Corp., says that numerous automotive and aerospace manufacturers prefer laser sensors to other types because they are noncontact and more accurate. Origin has made LaserGauge (LG) handheld 2D laser sensors since the late 1990s and recently introduced its first EOAT-mounted version.
Origin began equipping its sensors with blue lasers about three years ago. The reason, according to Powell, is the blue laser is more accurate due to its ability to measure on all materials (opaque, translucent and transparent). He likens the industry movement toward blue lasers to the introduction of the Blue Ray disc and DVD player in the mid-2000s. The player’s blue laser that reads the disc has a smaller spot than the standard red laser, resulting in a higher resolution and sharper image.
Ironically, the narrow focus of the laser can be the sensor’s undoing in the wrong application. For example, if there’s excessive vibration or backlash in the positioning system, the laser could pass nearby the target without detecting it. In this case, a standard photoelectric sensor with a wide beam pattern would be more appropriate.
A bigger problem, though, is the assumption by manufacturers that a dense, powerful laser can easily cut through any dusty environment. This is not real-world thinking, according to Moermond.
“A laser is often interrupted by airborne particles anywhere between the front of the sensor and where it touches an object,” says Moermond. “Just try to send a laser through a very dusty environment, and watch the light beam scatter all over the place.”
So Many to Consider
Suppliers offer a wide variety of laser sensors, all of which feature a light emitter, a light receiver (separate or built-in) and components that evaluate and amplify a detected signal. One of the most common types of laser sensors is the photoelectric. Three varieties of photoelectric sensors are used in automated assembly.
A reflective (or diffuse) model houses both the emitter and receiver. Light from the emitter hits the target, and the reflected light is diffused from the surface at all angles. If the receiver receives enough reflected light, the output will switch states. When no light is reflected back to the receiver, the output returns to its original state.
Through-beam sensors have separate emitter and receiver units that are aligned so the greatest possible amount of light from the transmitter reaches the receiver. When the target crosses the path of the light beam, it blocks light to the receiver. This causes the receiver’s output to change state. When the target no longer blocks the light path, the receiver’s output returns to its normal state.
Retroreflective sensors are similar to reflective ones in that both contain the emitter and receiver in one unit. With retroreflective sensors, however, light from the emitter is transmitted in a straight line to a reflector and returns to the receiver. When a target blocks the light path, the output of the sensor changes state. When the target no longer blocks the light path, the sensor returns to its normal state.
Laser sensors that measure objects or distances often do so using optical triangulation or time-of-flight technology. Optical triangulation involves placing a linearized charge-coupled device (CCD) at an angle to a pulsed laser. The laser beam is projected onto the target as a spot or line, and the light reflects back to the CCD at an angle.
As the part moves past the laser (or vice versa), the position of the reflected light on the CCD moves, too. Measuring the latter thus provides an accurate measurement of the former.
A time-of-flight system measures the time it takes for a pulse of laser to travel to a surface and return. Because the speed of light is constant, the sensor can calculate the difference.
Single-point laser sensors may use either technology to produce high-speed, high-resolution and accurate measurements related to position, displacement or distance; thickness or width; and runout or vibration. 2D and 3D sensors can also use these technologies to measure height, width, angles, gaps and shapes, as well as to detect defects.
The LJ-G5000 series of 2D laser displacement sensors by Keyence Corp. offers various stable measurements, including height and width. All five units are easy to use and feature an E3-CMOS image sensor that’s capable of taking simultaneous measurements at eight points. The sensors use triangulation and the Quatro link system to ensure high-speed sampling (3.8 milliseconds) and high accuracy (±0.1 percent of full scale).
For the past few years, Renault has been using LJ-G sensors on its G9 engine production line in Cléon, France. Workers there slide oil, sealing and compression rings onto each piston and then place many fitted pistons onto a pallet that is moved to an automated inspection platform.
Four pistons are simultaneously checked by four LJ-G sensors, and a profile is generated for each piston and compared against a ringless profile to ensure that all of the rings are in place. The ultra-thin oil ring is the hardest to inspect, while the 3-millimeter compression ring is the easiest.
Several automotive OEMs are considering installing Origin’s EOAT-mounted 2D LG sensor to accurately inspect and measure gaps and flush on translucent, shiny or opaque surfaces around vehicle doors, headlights, taillights, windows and chrome while the car is advancing on a moving assembly line. The sensor’s Cross-Vector configuration ensures that blue lasers provide multiple views at crossing angles to see around radius edges, resulting in a complete surface profile. Virtual gauges are configured for each measurement point, and specification limits are defined for each returned value.
Also available from the company is its handheld HS763 sensor, which uses a blue laser for translucent surfaces and solid body panels. Its standard Ethernet connection enables communication with a PC, robot controller or PLC. Inspection routines are created and edited using LGWorks software.
The Gocator 2512 3D profile sensor from LMI accurately scans glass, polished metals and plastic, and a wide variety of other specular materials and surfaces as they move on a conveyor. It scans objects at 8 microns X resolution and speeds up to 10 kilohertz, with 0.2 micron Z repeatability. The sensor is particularly well-suited for scanning consumer electronics assemblies that embed metal and plastic side by side in the same housing, as well as simultaneously scanning specular and diffuse surfaces; for example, a cell phone’s cover glass and its frame. The sensor also accurately performs geometrical dimensioning and tolerancing measurement of assemblies with transparent, glossy and other challenging surface finishes.
“This sensor produces a 3D model from scanning the surface of a moving part,” says Arden. “As a part passes through the laser scan plane, 3D cross-sectional profiles are accumulated to form a 3D surface. From this surface, measurements can be made to verify that key tolerances are achieved in part manufacturing or the assembly of mating components. This method allows the laser sensor to be mounted over a conveyor to monitor part quality control or measure volumetric data for sorting boxes in a packaging process.”
Some suppliers offer self-contained “smart” laser sensors with built-in logic capability that easily integrate into the production line. One such laser is the CSLS model that measures the speed of rotating targets at distances up to 65 feet. It is made by Monarch Instrument and, when used with a Fast Fourier Transform analyzer, quickly determines rotation speed without a reference mark.
Manufacturers can use the sensor to track surface irregularities and provide outputs from reflective tape, contrasting colors and keyways. Rated at IP64, the sensor is suitable for use in dusty damp environments and includes a 0.25-inch tripod mounting bushing.
Balluff’s latest photoelectric sensors include the BOS21M-HPL and BOD21M. The BOS21M-HPL offers background suppression, ensuring reliable defect and part detection regardless of the target’s surface, color and material. The BOD21M is designed for distance measuring. Both models are IO-Link enabled so operators can monitor each sensor’s voltage-overload status, number of cycles performed and other diagnostic factors. Numerous mounting options are available to optimize flexibility.
Heavy users of the BOS sensor are automotive, food packaging and life sciences companies. Moermond cites one automotive customer that uses the sensor to verify the presence of a gasket in a valve body.
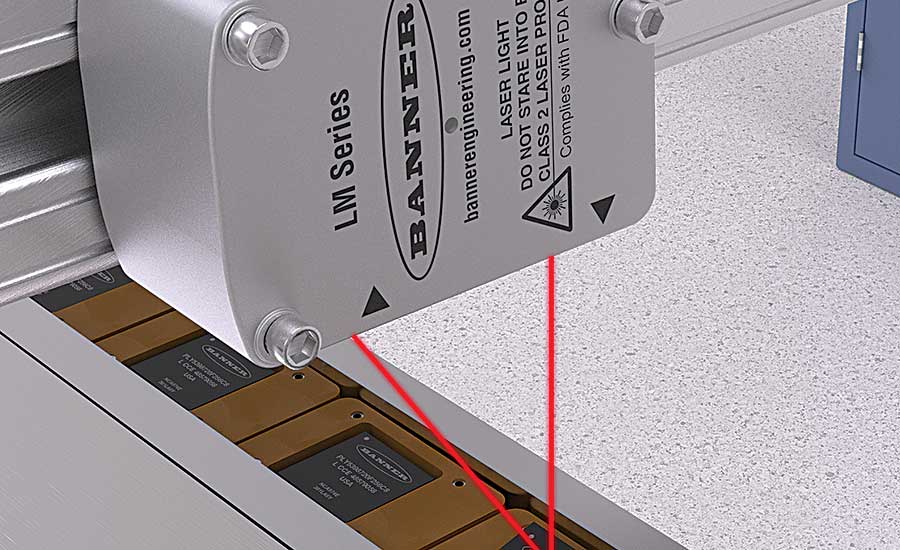
Banner introduced its compact LM series of laser sensors in 2018 to help manufacturers more accurately measure parts during assembly and inspection, and improve part and positioning control during both processes. The sensors measure the thickness and height of moving targets having varying colors and reflectivity with high repeatability. The sensors have a measurement range of 50 to 150 millimeters, and provide 0.004-millimeter resolution with response speeds as fast as 0.5 millisecond.
Equally important, the sensors offer mounting stability and have a temperature effect of ±0.008 millimeter per degree C. Holmes says that this minimal change is important for high-precision applications, because even a few degrees of temperature change can cause any sensor measurement error to double. An optional RSD remote display stores up to six configurations for product changeover and easy device replacement.
“To find the best laser sensor for any application, follow three rules,” advises Holmes. “First, really try it out. Second, tilt it 5 to 10 degrees so the target’s shininess doesn’t trick the sensor. Third, always keep real-world expectations.
“These include understanding that the claimed micron precision number is under perfect conditions, and taking into consideration the ongoing challenges of the target surface, color and vibration.”
Looking for a reprint of this article?
From high-res PDFs to custom plaques, order your copy today!


