Robots Assemble Precision Medical Device

To go from prototype to small-scale production system, Automation Nth created a digital twin to improve the physical layout and ensure that robots could reach every position.
Photo courtesy Automation Nth
Some automated assembly projects are easy. If you have previously designed a system to assemble, say, a cannula or a dispenser cap for a bottle of laundry detergent, it’s not that difficult to design a system to put together a similar product.
Other projects require a certain amount of iteration. A case in point: A medical device manufacturer had been trying to automate a key element of assembly process for seven years without success. The company’s product, a Class II medical device, requires a process to insert a very thin component—the thickness of two hairs—into a hollow part that is not much wider.
Workers needed to insert the component by hand with the assistance of magnifying lenses. As a result, production efforts were constrained by this slow and tedious process, which caused operator fatigue and creates potential for damaged product.
Multiple companies attempted to automate the process without success. My company, Automation Nth, would be the next in line—and, we hoped, the last. We approached the problem by assessing a proof of concept system developed by another automation company. We conducted a risk and gap analysis of the system to help the customer understand if the proof of concept could be adapted into a high-volume production system.
These analyses highlighted a significant risk in the concept. The fragile component could be damaged in the assembly process, turning the whole product into a failed part. Our analyses also showed that the concept did not have the capability to fully assemble the components. However, we also determined that these challenges were surmountable, and we outlined a clear path towards automated assembly.
To mitigate the risk, we recommended that the manufacturer first develop a prototype system that solved the risks and gaps before proceeding to full automation.
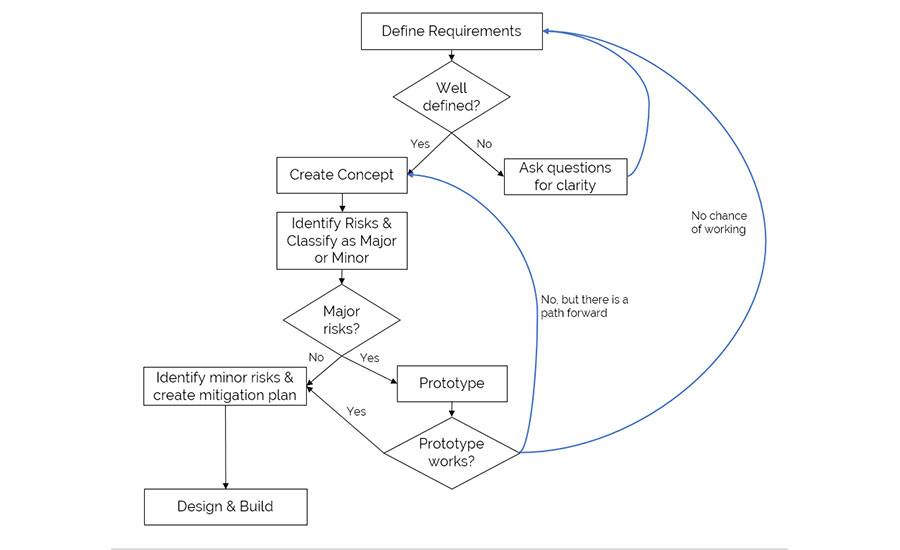
The first steps in building an automated assembly line are to define the system’s requirements, identify risks, and build a prototype. Photo courtesy Automation Nth
Requirements Gathering
Understanding the customer’s production processes and requirements is a critical step to reduce risk in automation projects. Our approach ensures that we will understand the customer’s processes and requirements at least as well as the customer does, if not better.
In this case, the operators showed us how they completed their manual processes, and we observed their work cycles. We then interviewed them to understand the typical failures and challenges in the assembly process. We also conducted time studies and interviewed management to understand all aspects of the production system.
Rapid Protyping
We started the prototype design with a desire to reapply as much as possible from the proof of concept, including hardware and design, to save the customer time and expense.
To create the prototype design, we calculated the physical layout of the system so that the robots could reach all areas with as small of a footprint as possible. We then engaged our mechanical partner to create a 3D concept for the system.
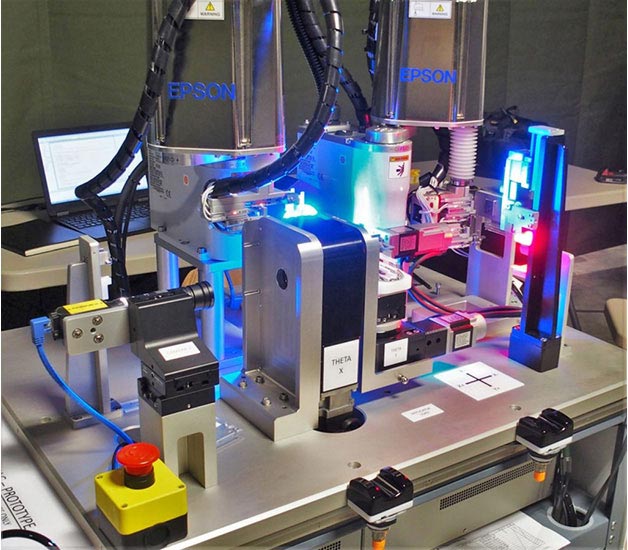
To create the first prototype system, engineers used advanced software to simulate the robotic movements in the assembly cycle. Photo courtesy Automation Nth
In parallel, we used advanced software to simulate the robotic movements in the assembly cycle, creating a “digital twin” of the prototype. Our digital modelling efforts ensured that the robots could reach all their points efficiently before we committed to any metal fabrication. The digital twin also helped us learn that we needed to move robots and stations in the physical layout to optimize motion efficiency. Our thorough pre-fabrication modelling ultimately saved the customer time and money with less rework.
After simulations confirmed that our physical layout was feasible, we authorized our mechanical partner to start building the prototype.
Debug and Optimization
Throughout the mechanical build, our controls engineers continued improving the robot, PLC, and vision programming to achieve the highest possible overall equipment effectiveness (OEE). We used this valuable period to improve fault recovery time, increase reliability, and optimize robot and pneumatic motions to overlap when possible. We also organized the PLC, robot and vision code to optimize cycle time.
Automation Nth also proactively found a way to increase yield of the product. Previously, when one of the components was slightly off-spec (which was not uncommon), it would have to be rejected, causing scrap and lost production time. We devised a mechanical system that allowed the robots to handle these components even if they were off-spec.
We also identified another component with tolerance issues that were not visible to the naked eye and therefore had not previously been identified. As a result, the customer was able to visit the supplier of the component to resolve the issue before the start of high-volume production.
This work resulted in a 63 percent cycle time reduction from the prototype’s first production cycle.
The HMI of the small-scale production system displays key statistical process control (SPC) values so managers can see how they’re trending over time. Photo courtesy Automation Nth
We integrated data generated from the prototype with the data available in our customer’s corporate database, which assisted our customer in meeting a requirement to maintain traceability of all the product components and process parameters. Pulling data directly from the corporate database enabled us to use their active directory for user authentication and obtain incoming product component signature data. Armed with this data, the system knew component test results, and the robots would skip bad components automatically.
First System Results
After our customer struggled for seven years to find a successful automation system, Automation Nth passed the factory acceptance test on the prototype system only four months after receiving the customer’s purchase order. The customer provided feedback that after initial testing, “the assembly system resulted in the cleanest data ever generated in this application.”
The prototype system’s OEE consistently hovered near 100 percent.
Transition to Full Production
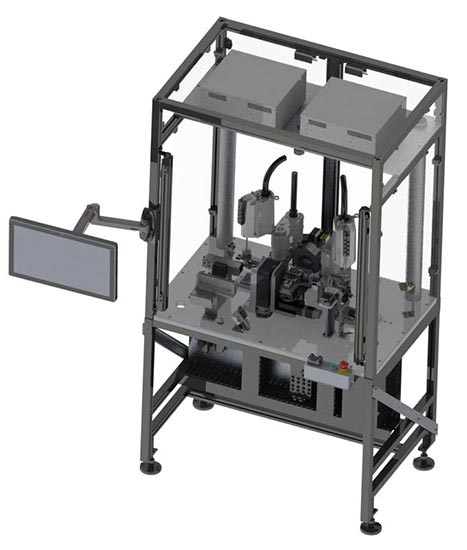
After accepting our prototype system and validating that risks had been mitigated, the customer was ready to move to a small-scale production system. Once again, Automation Nth created a digital twin to rapidly design the system, improve the physical layout to ensure that robots could reach every position, and optimize the process. The digital twin helped us develop a better design and reduce time spent debugging the system by a few months, saving the customer large amounts of money and time.
For the small-scale production system, the customer wanted us to provide visibility for key statistical process control (SPC) values on the HMI and how they’re trending over time. Operators and management can also view key production data on their mobile devices.
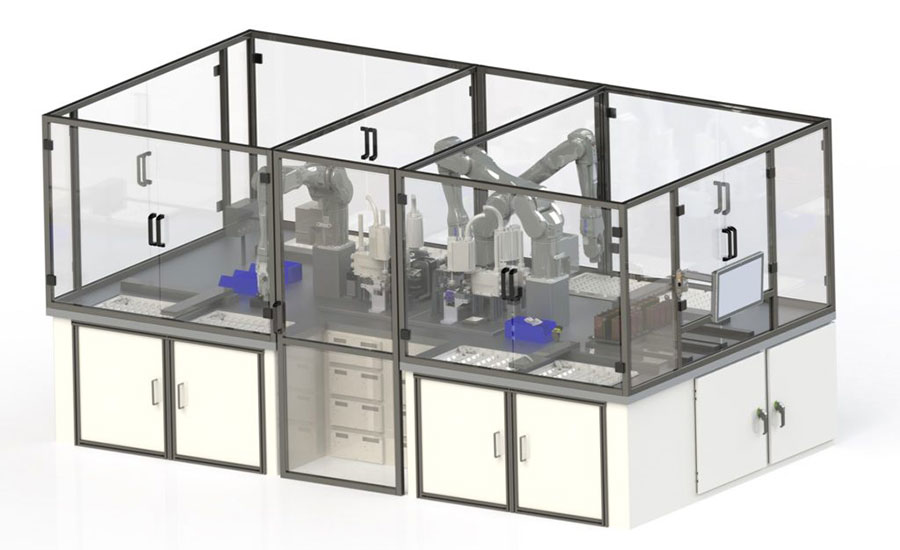
The high-volume system requires little operator involvement. An operator only has to deliver trays of parts to the system every 7.5 minutes. Photo courtesy Automation Nth
After a successful site acceptance test of the small-scale production system, the customer wanted Automation Nth to pursue a high-volume system. As before, we created a concept, then developed a digital twin to rapidly design and optimize it.
The high-volume system requires little operator involvement. An operator only has to deliver trays of parts to the system every 7.5 minutes, providing for virtually “lights out” automation.
To better understand how the automation would be integrated into the manufacturing environment, Automation Nth used FlexSim software to create a simulated factory environment. Our simulation helped the team understand how operators would be able to run the system and how efficient they would be. It also confirmed the staffing levels required with lifelike, random circumstances.
Strategic partnership with the customer was incredibly important for the project’s success. The customer engaged us upstream in the automation development process, which enabled us to greatly decrease the project’s risk. The trust built between the two companies also enabled a free flow of ideas and collective problem solving and led to a project that was on schedule and within budget.
For more information on automated assembly systems, visit www.automationnth.com.
ASSEMBLY ONLINE
For more information on assembly automation, read these articles:
Yamaha Smart Factory Features AGV Bypass System
Automated Line Assembles Pressure Gauges
Robots Automate Assembly of Battery Packs for Electric Buses
Looking for a reprint of this article?
From high-res PDFs to custom plaques, order your copy today!


