Assemblers know that practice makes perfect when it comes to properly operating a fastening tool. They also know the importance of tool preparation, which includes torque testing and calibration. Both practices ensure that a tool always applies the correct amount of torque to a threaded fastener during installation.
“Regular testing and calibration are becoming increasingly important despite technological advances in fastening tools,” claims John Reynertson, COO and vice president of engineering for Sturtevant Richmont. “Wear of the tool’s measuring element due to friction, vibration, abuse and fatigue negatively affect the torque calibration of even the most advanced tools. Torque testers are still needed as the traceable reference to verify the tool’s accuracy.”
For many years, only tools that installed safety-critical fasteners were tested and calibrated. That changed in the 1970s when manufacturers began calibrating all their fastening tools due to a greater emphasis on product quality and bolted-joint reliability.
Tool calibration again increased in importance in the 1990s when manufacturers began making smaller, lighter products with very tight torque tolerances. Properly calibrated fastening tools are absolutely necessary to meet these specifications.
Today, OEMs and Tier 1 suppliers rely on a wide range of torque testing equipment to calibrate their tools. Torque testers are most common, but suppliers also offer torque analyzers and sensors, stand-alone transducers and run down adapters (joint simulators). All of these devices help maintain proper tool torque so assemblers can perform repeatable and error-free fastener installation.
A Decades-Old Challenge
Manufacturers have needed to calibrate fastening tools since the first hand torque wrenches became commercially available in the 1930s. Reynertson says the P.A. Sturtevant Co. introduced its first torque tester, the Optical, in the 1940s. It featured a built-in mechanical loading system that provided a consistent load point and an accurate loading rate for testing.
In the 1940s and 1950s, Frank Livermont (owner of the Richmont company) developed several torque-testing devices for wrenches. A decade later, he pioneered power tool testing with the invention of the P-15 tester.
Some 20 years after that, the Lockheed Missiles and Space Co. (LMSC) asked Mountz Inc. to build a torque tester for the Mountz fastening tools LMSC was using. This tester, the ETA Mark 1, brought Mountz into the torque-testing market, notes Brad Mountz, president and CEO of Mountz Inc.
“Lockheed kept its tools in the metrology department and calibrated them in the department’s cal lab every six months or so,” explains Mountz. “The tools were then sent out to assemblers in the plant. This was the standard approach at the time: A set time frame for tool calibration, with no concern for usage amount or performing other tests.”
Digital-based torque measurement equipment appeared in the late 1970s and quickly became popular. It offered a higher-resolution display panel and more capability than analog and dial-indicating devices.
Microcontrollers further increased the capabilities, and lowered the cost, of digital torque testers by the late 1980s. Since then many other features have been added to torque testers, such as computer interfaces and software for data control. The equipment is also getting smaller for easier portability.
Most Any Tool
All manual and power fastening tools require regular torque testing and calibration, says Russ Hughes, product marketing manager for Desoutter Industrial Tools. Common manual tools are dial and digital screwdrivers, and beam and click wrenches. Power tools include electric, pneumatic and hydraulic models.
Torque testing of manual tools is done according to the ISO 6789 standard. For power tools, ISO 5393 is followed.
When a tool should be tested and calibrated depends on how often it is used and the criticalness of the joint. Reynertson points out that some automakers test all their power tools and manual wrenches every hour.
Phil Klingler, divisional product manager for the ASG Div. of Jergens, says that Tier 1 suppliers often test and calibrate tools used in high-volume, critical-joint applications before every shift. This is because they know that even one critical-joint failure can terminate their supplier contract with an automotive OEM.
“The aerospace industry also tests tools quite often, even though their production volume is very low,” says Klingler. “Plane assembly is mostly manual, which allows for extensive torque testing before each shift and auditing after each fastener is installed.
“In contrast, white goods manufacturers have high production volumes but very few critical joints. Their focus is less on torque control, and more on making sure the screws are threaded all the way into the sheet metal.”
Tom Hutchens, division sales and business development manager of the MVI group at AIMCO Global, says most manufacturers have an either-or testing frequency plan. This means the tools are tested at, say, either 50,000 cycles or 30 days—whichever comes first.
Hutchens says that low-volume medical-device manufacturers perform torque testing infrequently. They tend to emphasize torque auditing, which verifies the residual torque that’s actually in the assembled joint.
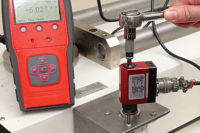
Torque testing and calibrating a manual tool is easy to do and only takes about 5 minutes. The individual positions the tool on the test equipment and then rotates the tool to simulate fastener installation. A transducer (within the equipment or stand-alone) measures the applied torque, which is visually displayed. The tool is then calibrated to the proper torque and retested for verification.
To ensure an accurate torque reading, the tool must remain perpendicular to the transducer throughout the arc of tool movement. Technologically advanced power tools can take up to 30 minutes to test and calibrate because they require the completion of a complex series of torque tests.
Testing is usually performed by a trained technician at the plant’s calibration lab or an independent lab, rather than an assembler. However, small manufacturers may prefer to have their assemblers trained to test and calibrate tools.
Equipment Selection and Performance
Mountz says manufacturers need to address several questions before selecting a torque tester. These include: What type of torque is being measured (static, dynamic or both)? Does the tester need to be flexible enough to connect with external torque sensors now or in the future? Does the company need to collect, save and export torque testing data and pulse counts (if it uses pulse tools)? And, is the tester also being used for torque auditing?
Reynertson says manufacturers need to be sure that all testing equipment can measure the entire torque range of the tools being tested. He also recommends manufacturers follow, as much as possible, ANSI/NCSL Z540-1-1994, which requires testing equipment to be four to 10 times more accurate than the tool. For example, if the tool’s accuracy is within 4 percent, the equipment’s accuracy should be within 1 to 0.4 percent.
“Always have calibration experts set up your testing program, and remember that testing is done in a controlled environment,” recommends Klingler. “Companies worry when tools are calibrated to apply, say, 10 in-lbs, but the torque audit only shows 8 in-lbs. This difference is OK, so long as both numbers are fairly close and remain consistent over time.”
“Consistency is also extremely important when it comes to testing procedures,” adds Hughes. “If a procedure includes 25 run downs of the tool, don’t suddenly drop it down to 10. So long as joint quality doesn’t suffer, lower the run-down number slowly and make it part of the official testing procedure in writing.”
Remember also that testing equipment, like fastening tools, falls out of calibration with use. All equipment needs to be calibrated at least once per year, per ISO standards (6789 and 5393), although some manufacturers do it much more often.
At the Mountz manufacturing facility in San Jose, CA, for example, lab technicians calibrate torque sensors on a daily basis. The company’s power fastening tools are tested on these sensors during final inspection.
Some suppliers include annual equipment calibration as part of the customer’s purchase package. Others perform calibration for a fee. Another option for manufacturers is contracting with an independent calibration lab. Mountz says there are nearly 30,000 such labs across the United States. Be sure the lab is accredited to the ISO-IEC 17025 standard.
Latest Models
Since 2012, Parker Hannifin Corp. has used the handheld Delta 6D torque analyzer from Desoutter to improve assembly of hydraulic hose fittings. Before then, a different tester indicated that the tool was properly calibrated at 19 ft-lbs, although torque audits repeatedly showed residual torque to be only 12 ft-lbs.
Parker Hannifin sent out the tool for service, but was told it operated properly. After the company’s quality department verified that the all dimensions on the assembled fitting were correct, Parker Hannifin mistakenly assumed the problem to be joint relaxation.
The tool was then tested on the 6D, which records and visually displays applied torque as a graph. Hughes says the graph showed tool torque quickly peaking at 19 ft-lbs, then dropping significantly. This indicated there was a problem with the tool’s clutch. Parker Hannifin replaced the clutch, and now the calibrated torque and residual torque are nearly identical.
All three models in the Delta series (1D, 6D, 7D) feature a built-in scheduler that ensures fastening tools get calibrated regularly. The analyzers also integrate easily with the plant’s main data base to enhance tool tracking and maintenance.
ASG’s Smart Transducer series of torque testers covers a torque range of 0.5 to 2,000 newton-meters. Transducer accuracy is ±0.5 percent, from 10 to 100 percent of full-scale torque. The transducers record peak, peak one-half and dynamic torque. Their plug-and-play design allows quick connection to the company’s ST digital testers.
A large West Coast aerospace company’s need for an analyzer with an iPad-sized touch screen was the impetus behind AIMCO’s development of the Auditor ATDA-8000 and ATDA-8000-10 analyzers. After initial setup, the ATDA-8000 provides semiautomatic, point-of-use tool validation.
The 8000 is a single-channel instrument, but the 8000-10 includes a multiplexor for connection to multiple company transducers. Parameter settings on both models are password protected.
By using Sturtevant’s System 8 transducer, technicians can rotate a tool clockwise or counterclockwise during torque testing. Accurate to ±0.25 percent, the transducer displays values up to six digits and stores up to 999 test results. A switch module allows connection with additional transducers, enabling manufacturers to test tools with a wide torque range.
Mountz’ TorqueLab LTT series tester comes with two accessories that quicken testing of multiple tools. The bar code reader lets a technician preset test parameters for several tools, rather than toggle through an extensive settings menu each time a tool is tested. After the bar code label of a tool is scanned, the tester automatically calls up the settings and tests the tool.
The multiplexer lets technicians connect the LTT to up to four transducers and operate them simultaneously. This accessory eliminates the need to plug and unplug torque sensors.
The DRBT-100 bench mount torque tester from Delta Regis Tools Inc. has a wide torque measurement range (1.5 to 90 in-lbs) and features two spring rundown joints. It stores 800 data points and lets the user enter high and low torque limits for “good” or “no good” indication during testing. A smaller unit, the DRBT-10, test tools with a torque range of 0.15 to 9 in-lbs.
The APEX Tool Group offers the I-Bench MSB for mobile torque testing of power tools and torque wrenches. Battery powered, this wheeled cart provides up to eight hours of testing and is equipped with software that allows wireless torque data acquisition. Versions are available to handle three, four or five transducers, all of which have an accuracy of ±0.5 percent.


